> ## Documentation Index
> Fetch the complete documentation index at: https://docs.clustr-ai.com/llms.txt
> Use this file to discover all available pages before exploring further.
# Salesforce Integration
> Connect Salesforce to surface referral intelligence on opportunities, contacts, and accounts
Clustr's native Salesforce integration surfaces your network intelligence directly inside Salesforce through **Lightning components** on opportunity, contact, and account records.
## Connect Salesforce
1. Go to **Integrations** in the Clustr dashboard and select **Salesforce**.
2. Click **Connect Salesforce**. You'll be redirected to Salesforce to authorize access.
3. Once authorized, you'll be returned to Clustr with your org connected.
Only one CRM can be active at a time. If HubSpot is already connected, disconnect it before connecting Salesforce.
## Enable the Cards
After connecting, you need to add the Clustr components to your Salesforce page layouts. This is a one-time setup per record type; repeat for opportunities, contacts, and accounts.
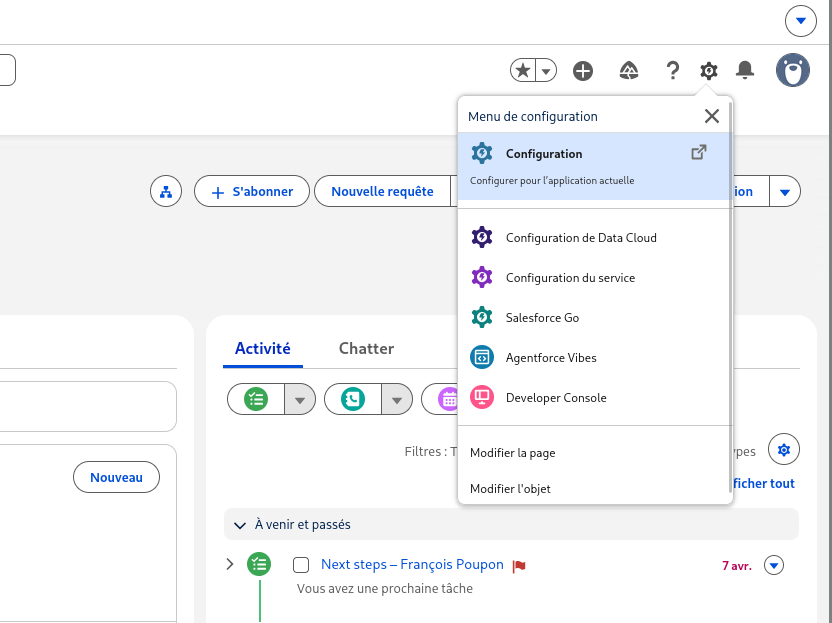
Open any opportunity (or contact, or account) in Salesforce. Click the **gear icon (⚙️)** in the top-right corner, then select **Edit Page**.
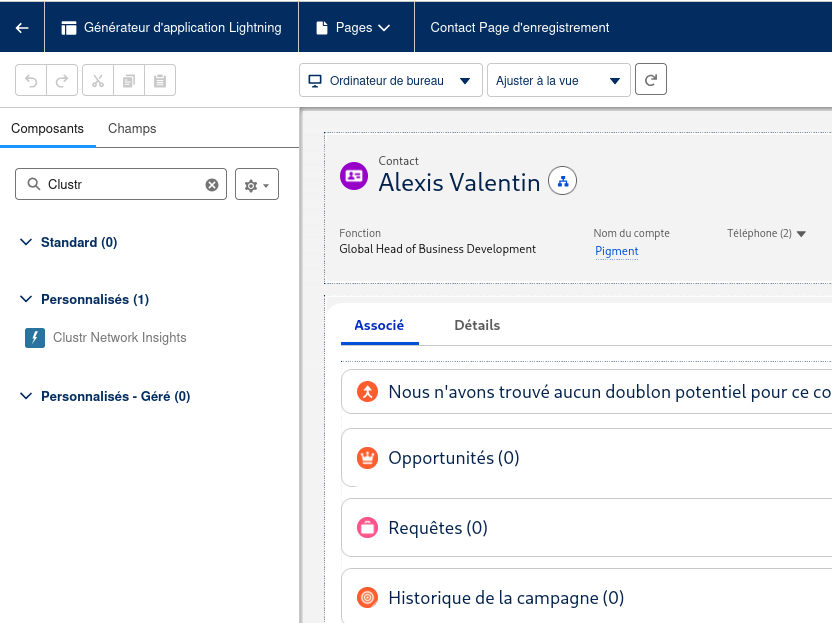
 The **Lightning App Builder** opens. In the left panel, type **Clustr** in the component search box. The Clustr card appears under **Custom** components.
 Drag the Clustr component from the left panel onto the desired section of the page layout on the right.
Click **Save**. If prompted to activate the page, click **Activate** and assign it as the **Org Default** so it appears for all users.
**Component names to look for:**
| Record type | Component name |
| ------------- | ------------------------ |
| Opportunities | Clustr Deal Intelligence |
| Contacts | Clustr Network Insights |
| Accounts | Clustr Company Insights |
## How It Works
Contacts and accounts in Salesforce are automatically matched to your Clustr network via domain and LinkedIn URL. Their latest CRM activity is shown alongside relationship data.
Each card shows:
* A **confidence score** for each referral path
* The **connector** who can make the introduction
* Shared work history and recent engagement activity (calls, emails, meetings)
* An **In CRM** flag for prospects already in Salesforce, with a direct link to their record
* Links to each prospect's LinkedIn profile and Clustr page
From any card you can **Import to Salesforce** to push prospects into your CRM, or **See all in Clustr** to explore the full list.
## The Cards
Every card has two tabs. The first tab shows **how to reach** people (your paths in). The second tab shows **what you can leverage** (who can be introduced through them).
* **At {company}**: prospects reachable through your network
* **From {company}**: who opportunity contacts can introduce you to
Closed opportunities default to the "From" tab.
* **From**: who they can introduce you to
* **To {contact}**: who can introduce you to them
If the contact isn't in Clustr yet, you'll see an import prompt.
* **At {account}**: prospects reachable through your network
* **From {account}**: your contacts who can intro elsewhere
## Settings
Once connected, you can configure write permissions and field mappings from the Salesforce integration settings page.
### Write to Salesforce
| Permission | Description |
| --------------- | -------------------------------------------------------------------------------------- |
| Create Contacts | Push new people Clustr discovers into Salesforce |
| Create Accounts | Create account records when a contact's employer is missing (requires Create Contacts) |
| Tasks & Notes | Log warm-intro requests as tasks and add notes to records |
### Field Mappings
Clustr maps its internal data model to your Salesforce field API names. The defaults match Salesforce's standard schema. Change them only if your org uses custom fields.
**Contacts**
| Clustr field | Default Salesforce field |
| ------------ | ------------------------- |
| LinkedIn URL | *(not mapped by default)* |
| Email | `Email` |
| First Name | `FirstName` |
| Last Name | `LastName` |
| Phone | `Phone` |
| Job Title | `Title` |
**Accounts**
| Clustr field | Default Salesforce field |
| ------------ | ------------------------ |
| Name | `Name` |
| Domain | `Website` |
**Opportunities**
| Clustr field | Default Salesforce field |
| ------------ | ------------------------ |
| Name | `Name` |
| Amount | `Amount` |
| Stage | `StageName` |
### Sync
Click **Sync Now** to trigger a manual sync between Salesforce and Clustr. The integration also syncs automatically in the background.
Drag the Clustr component from the left panel onto the desired section of the page layout on the right.
Click **Save**. If prompted to activate the page, click **Activate** and assign it as the **Org Default** so it appears for all users.
**Component names to look for:**
| Record type | Component name |
| ------------- | ------------------------ |
| Opportunities | Clustr Deal Intelligence |
| Contacts | Clustr Network Insights |
| Accounts | Clustr Company Insights |
## How It Works
Contacts and accounts in Salesforce are automatically matched to your Clustr network via domain and LinkedIn URL. Their latest CRM activity is shown alongside relationship data.
Each card shows:
* A **confidence score** for each referral path
* The **connector** who can make the introduction
* Shared work history and recent engagement activity (calls, emails, meetings)
* An **In CRM** flag for prospects already in Salesforce, with a direct link to their record
* Links to each prospect's LinkedIn profile and Clustr page
From any card you can **Import to Salesforce** to push prospects into your CRM, or **See all in Clustr** to explore the full list.
## The Cards
Every card has two tabs. The first tab shows **how to reach** people (your paths in). The second tab shows **what you can leverage** (who can be introduced through them).
* **At {company}**: prospects reachable through your network
* **From {company}**: who opportunity contacts can introduce you to
Closed opportunities default to the "From" tab.
* **From**: who they can introduce you to
* **To {contact}**: who can introduce you to them
If the contact isn't in Clustr yet, you'll see an import prompt.
* **At {account}**: prospects reachable through your network
* **From {account}**: your contacts who can intro elsewhere
## Settings
Once connected, you can configure write permissions and field mappings from the Salesforce integration settings page.
### Write to Salesforce
| Permission | Description |
| --------------- | -------------------------------------------------------------------------------------- |
| Create Contacts | Push new people Clustr discovers into Salesforce |
| Create Accounts | Create account records when a contact's employer is missing (requires Create Contacts) |
| Tasks & Notes | Log warm-intro requests as tasks and add notes to records |
### Field Mappings
Clustr maps its internal data model to your Salesforce field API names. The defaults match Salesforce's standard schema. Change them only if your org uses custom fields.
**Contacts**
| Clustr field | Default Salesforce field |
| ------------ | ------------------------- |
| LinkedIn URL | *(not mapped by default)* |
| Email | `Email` |
| First Name | `FirstName` |
| Last Name | `LastName` |
| Phone | `Phone` |
| Job Title | `Title` |
**Accounts**
| Clustr field | Default Salesforce field |
| ------------ | ------------------------ |
| Name | `Name` |
| Domain | `Website` |
**Opportunities**
| Clustr field | Default Salesforce field |
| ------------ | ------------------------ |
| Name | `Name` |
| Amount | `Amount` |
| Stage | `StageName` |
### Sync
Click **Sync Now** to trigger a manual sync between Salesforce and Clustr. The integration also syncs automatically in the background.